Yaskawa Preparation
For Mimic Core 2.0
The Yaskawa Driver is currently in Beta state.
In this course, you will learn how to prepare robots from Yaskawa for using Mimic.
Please note that precision of the use of the robot with Mimic is dependent on the calibration of the robot itself. Not all robots are calibrated by default to address all application requirements. Please check the calibration of the robot prior to use.
What you need prior to Mimic installation
Full HD touch screen (1080p) touch screen (22" is recommended) or HD ready screen with mouse and keyboard
Gigabit switch (optional)
Ethernet cable
Mimic for Yaskawa - Robot Preparations
Hardware Setup
Complete the Tracker Hardware Setup before this step.
Please see 📄 Mimic Controller Setup (v2.4) to see what is needed for the Controller setup.
Wire the Mimic Controller to the Robot
Step 1. Connect the Ethernet cable to the Mimic Controller
Note: (Optional) Use a Gigabit switch.
Step 2. Connect the Ethernet cable to the robot
Preparing Robot
Configuring robot IP address
Step 1. Start robot in Maintenance Mode:
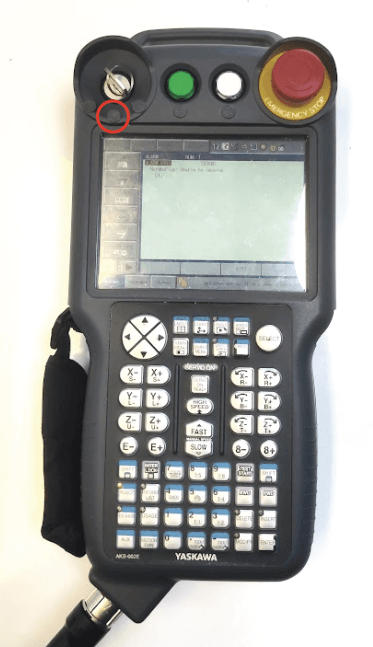
Press and hold the MAIN MENU key on the teach pendant and power the robot by turning the power switch on the controller, to enter the maintenance mode.
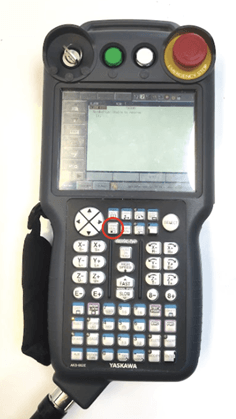
MAIN MENU on Teach Pendant
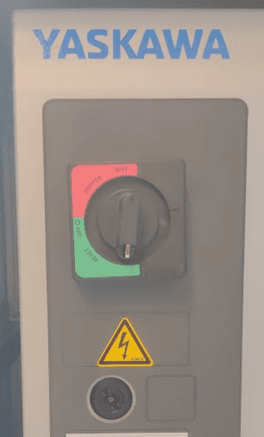
Power Switch on Control Box
Step 2. Select SYSTEM > SECURITY > SAFETY MODE.
Step 3. Enter the password.
The default password is sixteen 5’s:5555555555555555 (the maximum amount of numbers allowed in the input field), and then click Enter to enter SAFETY MODE.
Step 4. Select SYSTEM > SETUP > OPTION FUNCTION > LAN INTERFACE SETTINGS
Step 5. In IP ADDRESS SETTING(LAN2) (this is the name of an ethernet in the Control Box, named “LAN2) set IP ADDRESS to an appropriate IP address which does not conflict with existing IP addresses on the network.
Note: This IP address will be the same that is specified in Mimic Core.
Install Nordbo software on robot
A MotoPlus application is provided along with the Mimic installation. The MotoPlus application needs to be loaded onto the robot in order for Mimic to control it. Two MotoPlus application files are provided along with the robot code. These Motoplus application files are named NordboPlus_YRC1000_X-X-X.out and NordboPlus_DX200_X-X-X.out, where the X’s denote the version number.
The MotoPlus application can be acquired via the Nordbo Update Tool. Download the Yaskawa Driver in the Nordbo Update Tool. Here you will get the “robot code” (containing the MotoPlus application). Follow the instructions in the Nordbo Update Tool to copy all Yaskawa content onto a USB. The USB can then be placed in the Teach Pendant.
To load the MotoPlus application, follow these steps:
Step 1. If the robot is not already in Maintenance Mode, start the robot in Maintenance Mode:
Press and hold the MAIN MENU key and power the robot to enter the maintenance mode.
Step 2. Select SYSTEM > SECURITY > MANAGEMENT MODE
Step 3. Enter the password (the default password is sixteen 9’s: 9999999999999999), and then click Enter to enter MANAGEMENT MODE
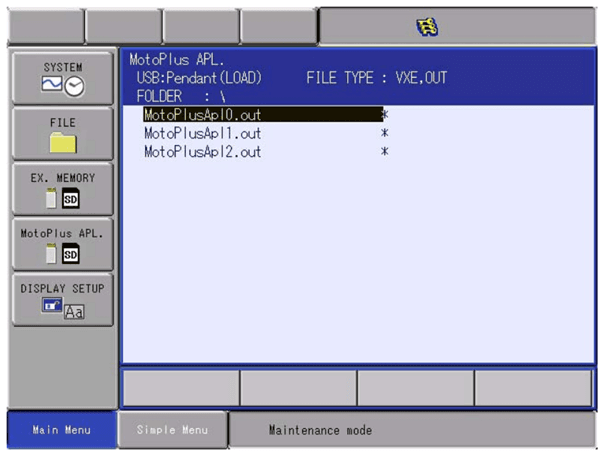
Step 4. In the main menu select MotoPlus APL.

Step 5. Specify the location of the MotoPlus application.
Insert a USB drive with the MotoPlus application on it. Select the appropriate file location under the DEVICE menu from the MotoPlus APL. submenu. E.g. if the USB drive is inserted in the Teach Pendant set TARGET DEVICE to USB:Pendant in the DEVICE menu.
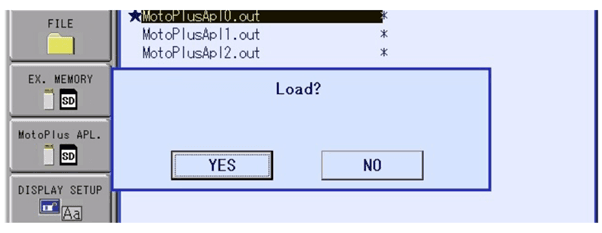
Step 6. Select and load a file.
Select the submenu LOAD(USER APPLICATION). This menu will show all the .out files on the location specified in the previous step.
Move the cursor to the correct MotoPlus application for your Controller version and press SELECT to specify that it is chosen to be loaded. An indicator should appear to the left of the file name, to signify that it has been chosen.
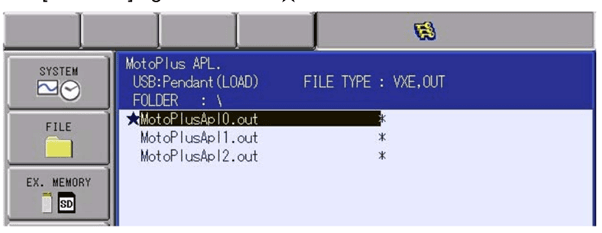
Press ENTER to load the MotoPlus application, then the following confirmation dialog box appears.
Step 7. After successfully loading the MotoPlus application and setting an appropriate IP address, power cycle the robot to boot into normal operation mode.
Transfer robot jobs
Robot jobs are used to build the robot programs on Yaskawa.
In the “robot code” (acquired through the Nordbo Update Tool) all robot jobs needed to use Mimic.
The following steps specifies how to move these files to the robot:
Start the robot in normal mode (turn the power switch on the Controller Box).
Navigate to EX. MEMORY in the main menu
Specify the file location.
Insert a USB drive with the robot job files on it. Select EX. MEMORY > DEVICE to go to the DEVICE / SETUP menu. Here, select the appropriate file location in the DEVICE field. E.g. if the USB drive is inserted in the Teach Pendant set DEVICE to USB:Pendant
Select EX. MEMORY > LOAD > JOB to enter the JOB file loading menu.This menu will show all the JOB files on the location specified in the previous step
Mark all the JBI files needed by pressing SELECT on them.
The needed programs are:
EVALUATE_JOB_NAME.JBI
NORDBO_CALLBACK.JBI
RUN_MIMIC.JBI
TRACK_MIMIC.JBI
NORDBO_MASTER.JBI
TEACH_MIMIC.JBI
Press ENTER to load them all onto the controller.
Using Mimic with Yaskawa robots
A number of robot jobs are provided to be used with Mimic. These are:
For controlling the robot with Mimic:
NORDBO_MASTER
This job enables control of the robot with Mimic.
In order to control the robot using Mimic, the NORDBO_MASTER job needs to be started. This job signals to Mimic that is able to take control of the robot, and handles some of the commands from Mimic. The NORDBO_MASTER job can either be started directly or from another job.
The NB_EXAMPLE job shows how to call Mimic programs from the robot. This can be done by calling the RUN_MIMIC, TRACK_MIMIC or TEACH_MIMIC jobs with the ID of the desired Mimic program.
For controlling Mimic from robot:
RUN_MIMIC
Enables running an existing Mimic program
TRACK_MIMIC
Calls Track functionality in Mimic
TEACH_MIMIC
Calls Teach functionality in Mimic
Provided example:
NB_EXAMPLE shows how to call Mimic programs from the robot. This can be done by calling the RUN_MIMIC, TRACK_MIMIC or TEACH_MIMIC jobs with the ID of the desired Mimic program.
Call another job on the robot:
EVALUATE_JOB_NAME
Mimic also supports calling jobs defined on the robot as part of a recipe. To enable this, the EVALUATE_JOB_NAME job needs to be configured correctly. To do this, either modify it directly on the Teach Pendant or in a text editor before transferring it to the robot. The job looks like this before modification:
NOP
CALL JOB:TEST_NORDBO IF I000=1
SET I000 0
END
Where TEST_NORDBO is a placeholder name, which needs to be replaced with the name of the desired job, and I000 contains the ID of the robot program specified by Mimic. If multiple different jobs need to be called from Mimic, add additional CALL instructions with different conditional checks on I000, e.g.
NOP
CALL JOB:JOB1 IF I000=1
CALL JOB:JOB2 IF I000=2
CALL JOB:JOB3 IF I000=3
SET I000 0
END
Where JOB1, JOB2 and JOB3 are user defined jobs on the Teach Pendant. These can then be called as part of a recipe by adding “Call robot routine” calls, with the desired ID, in this case either 1, 2 or 3.
Examples of robot jobs
Example to make robot program that enables control from Mimic:

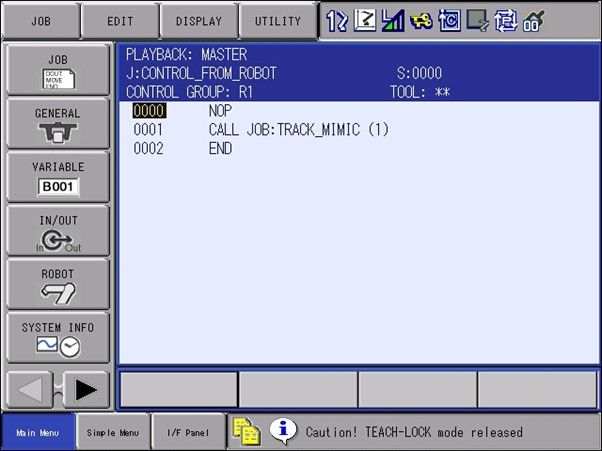
Example to make robot program that call and run program with ID 1:

Example to make robot program that call Track program with ID 1:
(if ID 1 does not exist, it will create a new program)
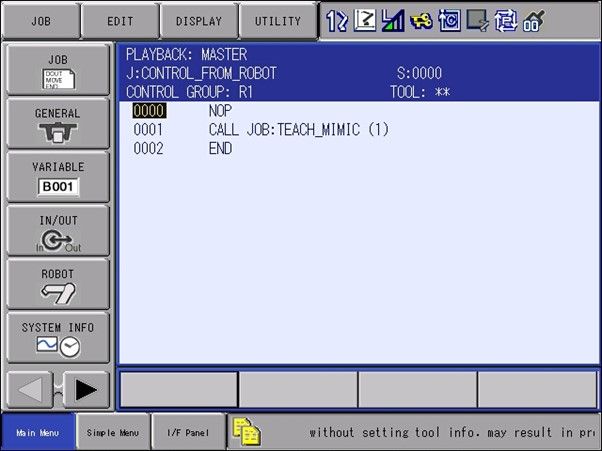
Example to make robot program that call Teach program with ID 1:
(if ID 1 does not exist, it will create a new program)
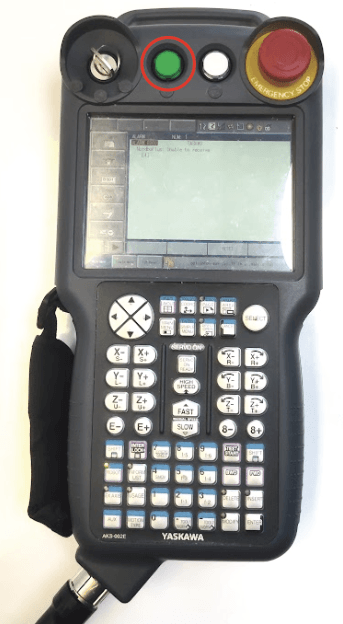
Starting a robot job
Step 1. Turn key to PLAY mode
Step 2. Use the NORDBO_MASTER job.
Step 3. Start servo on the green button on the Teach Pendant:
Using sub-routines with Mimic on Yaskawa
To use subroutines on the Yaskawa robots the EVALUATE_JOB_NAME job needs to be modified. The EVALUATE_JOB_NAME job describes the mapping from the ID provided in Mimic to a specific job. The EVALUATE_JOB_NAME job includes an example of how this mapping should be made as shown below:
NOP
CALL JOB:TEST_NORDBO IF I000=1
SET I000 0
END
Where TEST_NORDBO is a placeholder name for the job to be called and I000 holds the ID of the program to be called. A more complete example is shown below:
NOP
CALL JOB:SUBROUTINE1 IF I000=1
CALL JOB:SUBROUTINE2 IF I000=2
CALL JOB:SUBROUTINE3 IF I000=3
SET I000 0
END
Where SUBROUTINE1, SUBROUTINE2 and SUBROUTINE3 are user defined jobs to be called from Mimic, which are mapped to the ID’s 1, 2 and 3 as shown in the comparison with I000.
Your Yaskawa robot is now ready to use Mimic.