Mimic UR Software User Manual 2.8
Getting to Know Mimic UR
Mimic is a software platform that uses a tracking device to track the user’s movements, enabling the user to record and replicate complex movements that are challenging to automate with robots. Mimic records both position and orientation, drastically reducing the time spent programming and reprogramming a robot. Mimic UR is a URCap made for easy installation on Universal Robots and works together with a Tracker from Nordbo Robotics.
Mimic gives the user the following 3 main steps to create a recording:
Record
Tune (if needed)
Play
Mimic UR Contents
Mimic UR
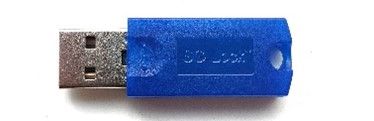
The Mimic URCap stored on a USB.
USB License Key
A USB that unlocks Mimic UR on a UR robot, when a Tracker is connected.
How to Install and Setup the URCap
How to Install the URCap
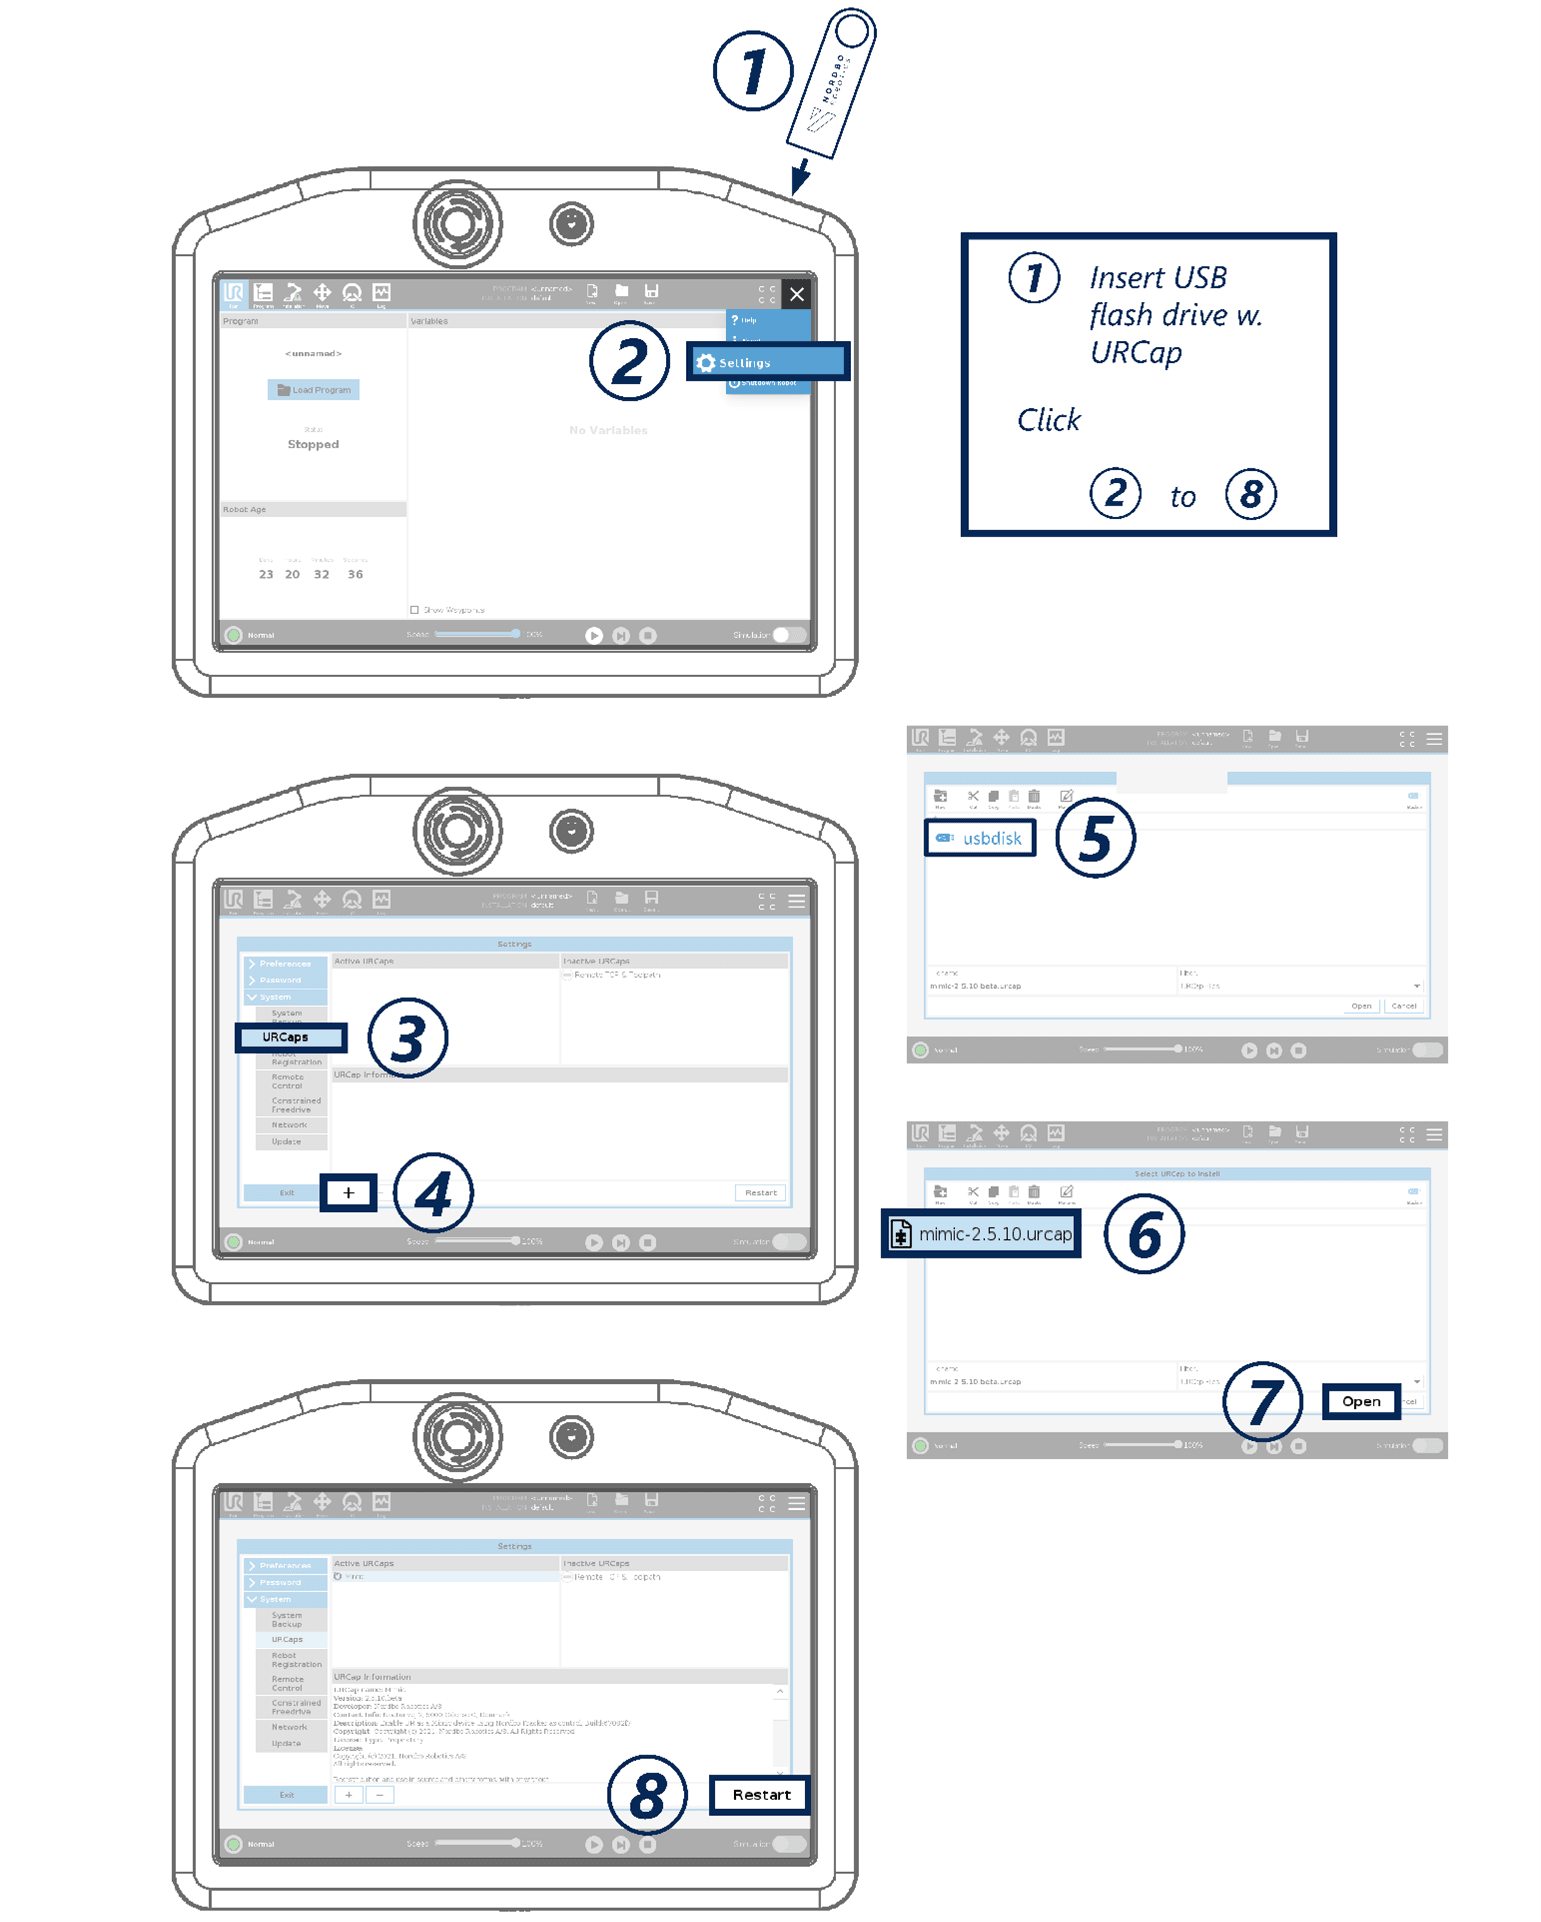
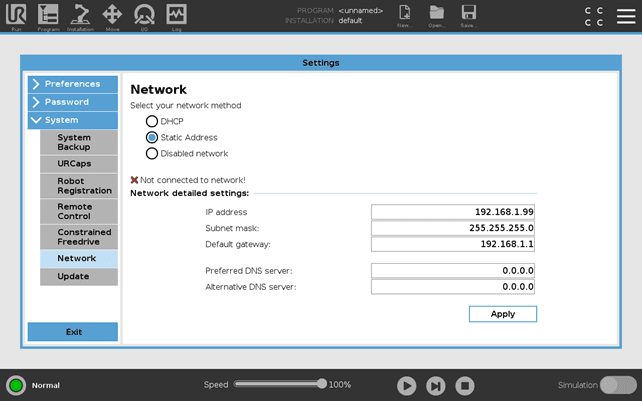
Set Robot IP
Go to Settings > System > Network (as illustrated in the picture below). Then set the following settings:
IP address: 192.168.1.99
Subnet mask: 255.255.255.0
Default gateway: 192.168.1.1
Click Apply.
The text "Not connected to network!" should now change to "Network connected!”. If it does not, please check that the robot is connected to the Tracker's Controller (see Tracker specific manual).
How to Configure the Software
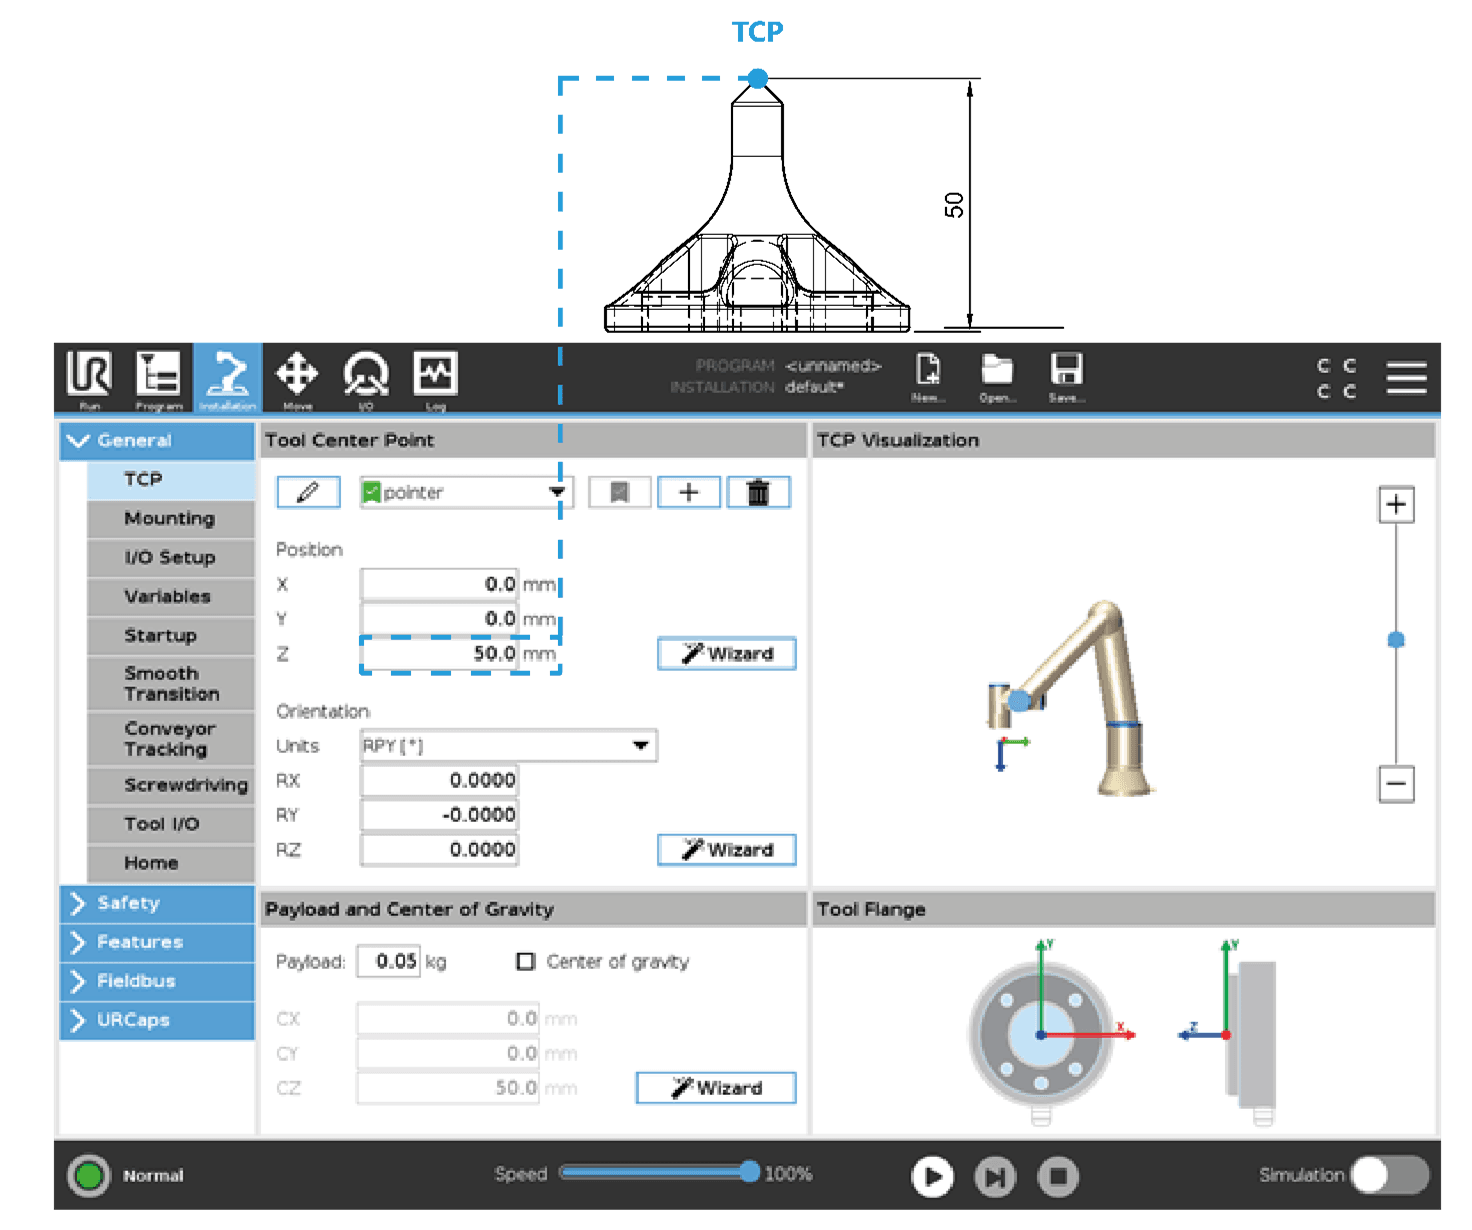
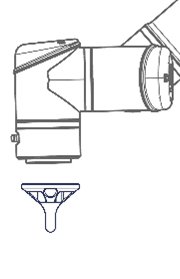
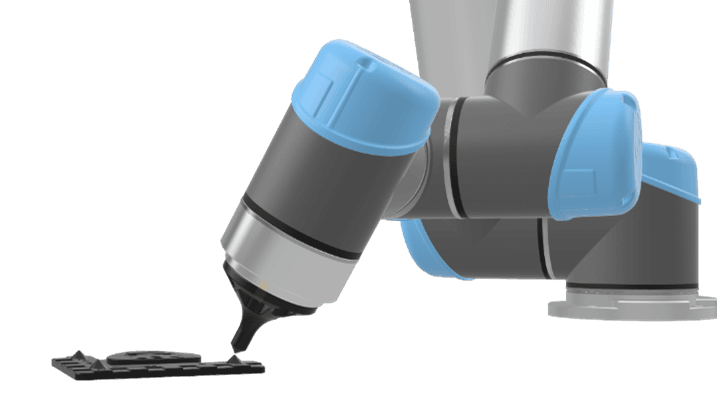
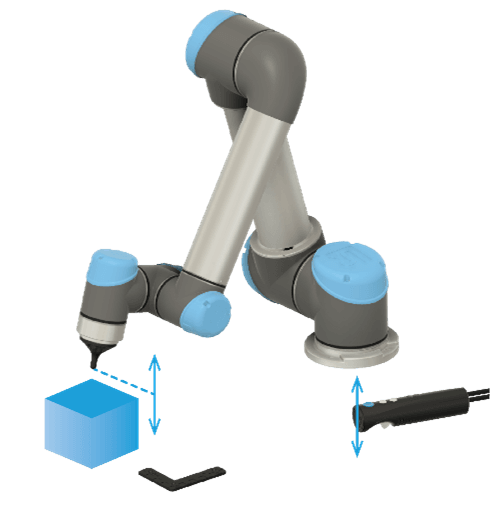
Calibrating Tool Center Point (TCP) of the Mimic Robot Pointer
The Mimic Robot Pointer is used for setting up Mimic. The Robot Pointer can be mounted on the robot. The TCP of the Robot Pointer is calibrated in Polyscope under Installation > General > TCP. The calibration of the TCP of the robot pointer is:
x = 0
y = 0
z = 50 mm
The TCP is illustrated below.
Mimic Installation and Setup
All the settings needed to modify the Mimic URCap can be found under Installation by selecting URCaps and Nordbo Mimic in the menu.
The contents are categorized into three main tabs:
Get started
Configure
Manage
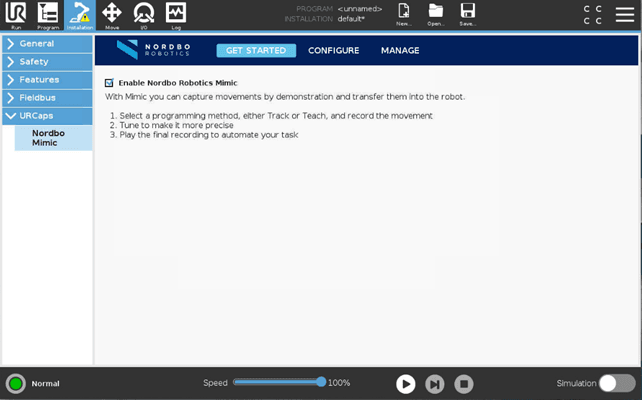
The following sections describes the three categories.
Get Started
The setup Mimic can be achieved with no License activated. Using Mimic will require a License.
To get started with Mimic, the USB License Key has to be plugged in to activate Mimic.
Mimic License
There are different License options available:
1) USB License Key
2) Mimic Play
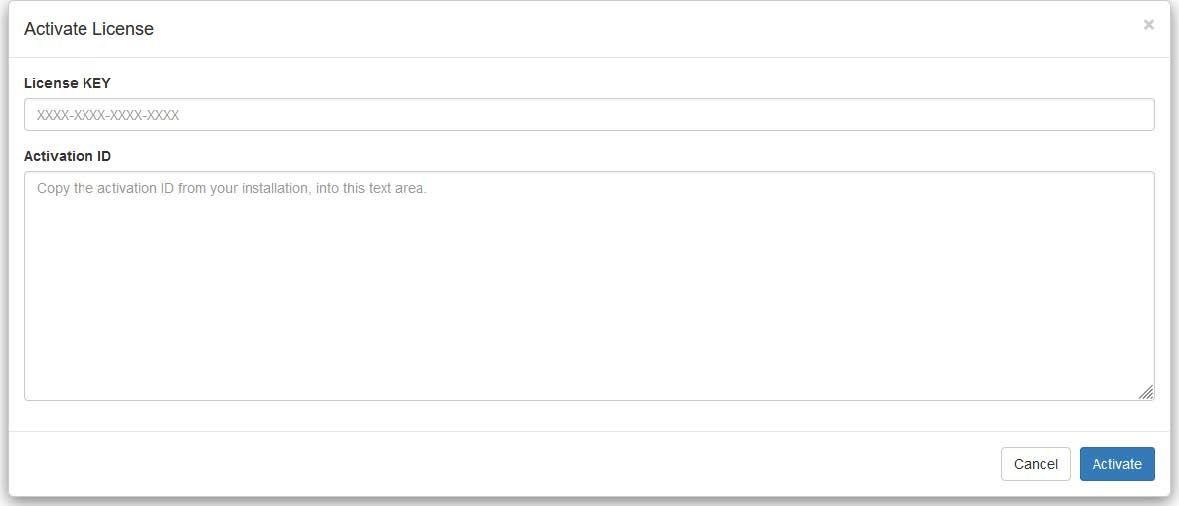
The Play License requires activation. If connected to the internet, this can be activated automatically. If not manual activation is required. This can be done in Installation > Nordbo Mimic > Manage > License. Follow onscreen instructions.
Before starting to work with Mimic, a popup asking to plug in the USB License Key will appear. Once the key is inserted, Mimic nodes can be used.
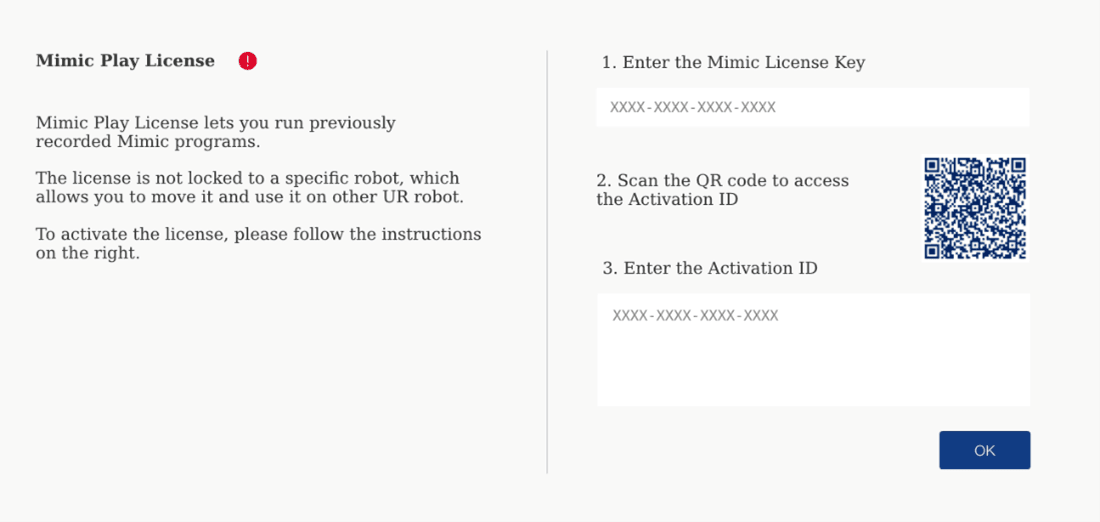
If activating license manually
To manually activate a license, follow these steps:
Scan the "Activation link" QR code
Click "Activate" after opening the link. You will now get an activation key
Press “Activate manually” and input the activation key. If a valid license is found, a green check mark will appear in Mimic UR on the License page.
Enable Mimic
To enable the Mimic nodes, the "Enable Nordbo Robotics Mimic" has to be checked (Installation > Nordbo Mimic > Get Started).
Configure
Configure provides access to all the settings and options related to:
Trackers
Joysticks
Reference frames
Outputs
Conveyors
![]()
Trackers
On the left side of the interface, a list of trackers that user has access to is displayed. Each Tracker comes with its own setup requirements. Set the desired Tracker as default.
Unless a custom IP address has been defined, each tracker as a default IP address:
EM Tracker: 192.168.1.100
IR Tracker: 192.168.1.101
FT: 192.168.1.100
Please refer to the Tracker manual for instructions on how to set a custom IP.
Smoothing
In Mimic, smoothing sample size is often used to reduce noise when capturing movements
The value for the smoothing sample size is influenced by variety of factors: the physical setup, surface treatment application and whether or not the robot tool is running while demonstrating the task.
In some cases, it may be beneficial to increase the smoothing of the recorded movement. The user can filter noise in the estimated position, by using the average of the latest recorded positions as one position. Moving the slider to the right will use a higher number in this average and reduce the noise. Note that this will increase the delay between the motions of the Joystick and the robot.
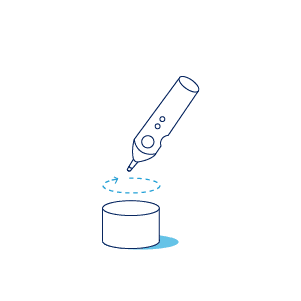
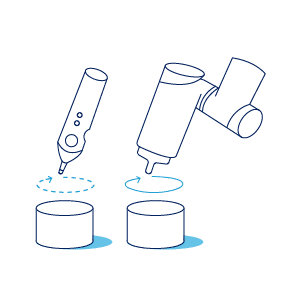
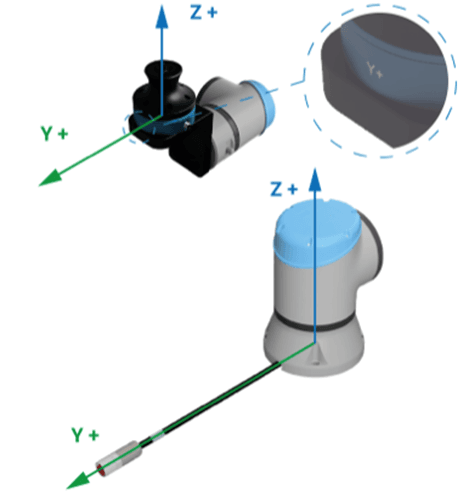
IR Tracker - Align Tracker with the Robot Base
To make sure that the robot follows the movements user demonstrates while holding the IR Tracker correctly, it is important that the orientation of the tracker is aligned with the cable from the robot base. To do so:
The Tracker must be powered on and connected
The Y-axis on the Tracker must point in the same direction as the wire at the robot base (see picture below) and be parallel to the working surface.
Then click “Align Tracker”
![]()
![]()
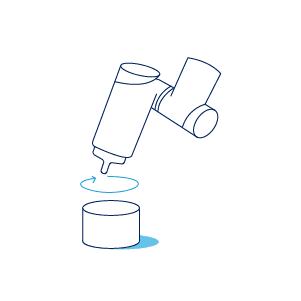
FT Tracker - Calibrate
The FT Tracker must be calibrated when mounted on the robot. See steps below.
![]()
The orientation of the FT Tracker is calibrated relative to the robot flange. To calibrate the FT tracker:
1. Press “Calibrate Tracker”. The screen will change to the "Move" tab.
2. To calibrate the FT Tracker, the Y- and Z-axis of the Tracker must be aligned with the Y- and Z-axis of the robot base. The Y-axis of the robot is in the same direction as the power cable.
3. In Polyscope, click "OK"
Joysticks
On the left side of the screen there is an overview of all the pre-installed joysticks as well as options to:
Add a new one
Rename existing ones
Copy
Set as default
Delete
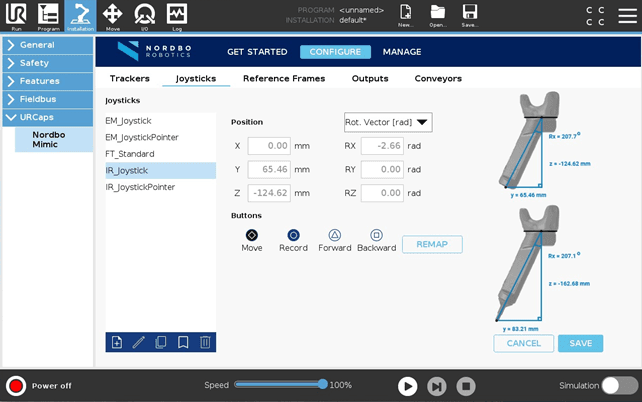
All preinstalled joysticks have preset TCPs. The preset TCPs cannot be modified.
Each selected joystick provides a visual, guiding user through calculations needed to calibrate the joystick correctly: position and rotation values from the origin of the coordinate system of the used Tracker to the TCP of the Joystick.
Besides joystick calibration, there is also a possibility to map the Mimic functions, Move, Record, Forward and Backward, to different buttons on the joystick itself or to external button controls. Click "Remap" to do so.
For more In depth guidance on Tracker-specific joystick and custom joystick calibration, please see Tracker-specific Manuals.
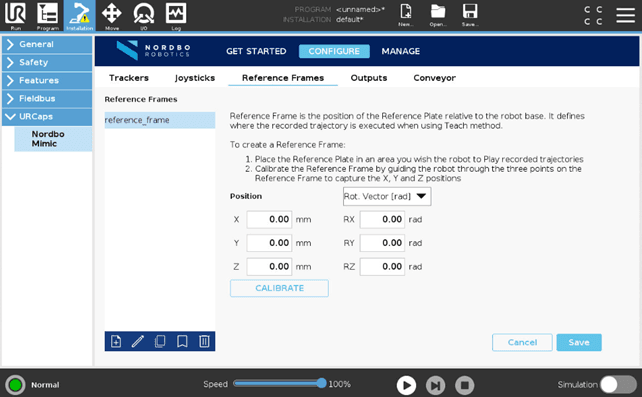
Reference Frames
The Reference Frame tab is used to specify where to execute Trajectories that have been recorded using the Mimic Teach node. When using the Teach node, the Trajectory is recorded relative to the Reference Plate. When executing the Trajectory with a Play or Tune node, it is executed relative to the Reference Plate. The Reference Frame is the position of the Reference Plate relative to the robot base.
Reference Frame: The position of the Reference Plate relative to the robot base.
Recording a Trajectory:
Playing a Trajectory in a Reference Frame:
Adding a Reference Frame
Use the Robot Pointer to add a Reference Frame.
Step 1. Mount the Robot Pointer on the flange of the robot.
Step 2. Calibrate the Reference Frame
Use the Reference Plate to calibrate the Reference Frame.
This provides the position for X, Y, Z, and rotation RX, RY, RZ (RPY) values needed to create the Reference Frame.
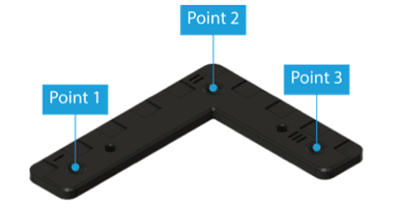
When pressing “Calibrate”, the user is taken to a three-point calibration of the Reference Frame:
Select the calibration tool in the “Robot TCP” drop-down menu
Press "Set" to set the position (pressing "Set" will change the screen to the "Move" tab)
Repeat the same procedure for Points 2 and 3
Once all three points have been captured, press “Save” and complete the Reference Frame calibration process
"Move here" can be used to check the position. Pressing this button will make the robot go to the point.

Outputs
The Outputs page allows the user to select which outputs to record.
Before recording a Trajectory using Teach or Track, the outputs to record can be configured in the Outputs tab. By default all outputs are recorded, even if not used actively. Remember to deselect the outputs that should not be recorded.

Conveyor Setup
The conveyor setup page allows for the setup of a conveyor belt to use with Mimic. Once setup, Mimic can move recorded Trajectories along the conveyor belt.
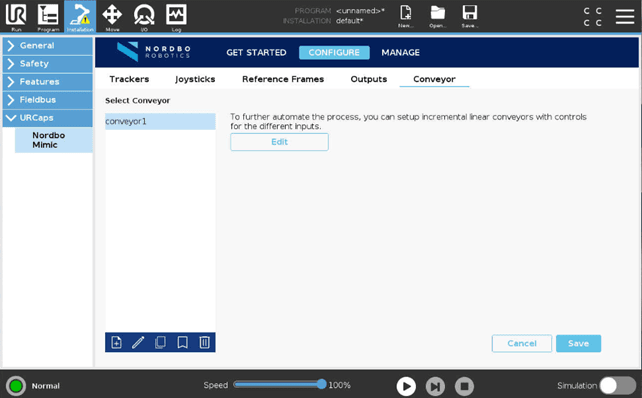
To use conveyor tracking while using the Track or Play node, a conveyor must be configured first.
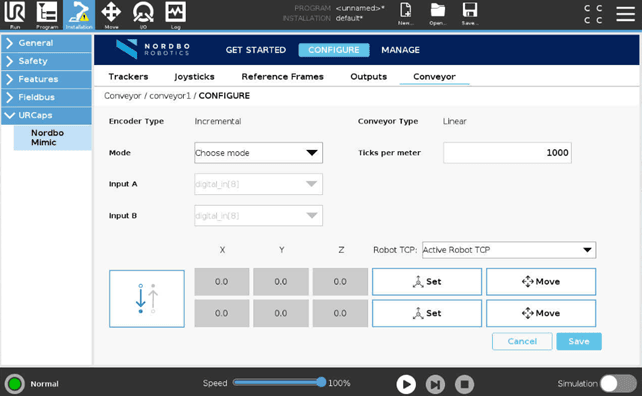
The user needs to define what inputs the encoder is connected to, the type of encoder, the number of encoder ticks pr. meter, and the direction of the conveyor.
Manage
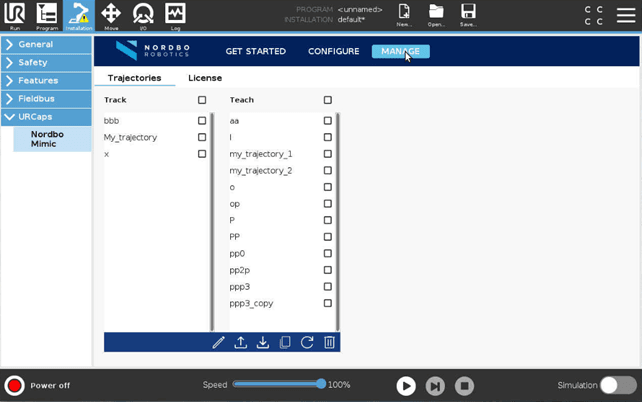
Trajectories
Trajectories tab provides an overview of all the trajectories recorded using either Track or Teach. In this part of Mimic software, users can:
Rename Trajectories
Export Trajectories to a USB
Import Trajectories from a USB
Copy Trajectories
Reset Trajectories
Remove Trajectories
Licenses
There are two types of licenses:
USB License Key. With Mimic License you can Track, Teach, Tune and Play the recorded trajectories. You have access to all the features and controls that Mimic UR offers.
Mimic Play License. Let’s you run previously recorded trajectories. The license is not locked to a specific robot, which allows users to move it and use it on another UR robot.
With internet connection, Mimic can automatically detect and activate both licenses.
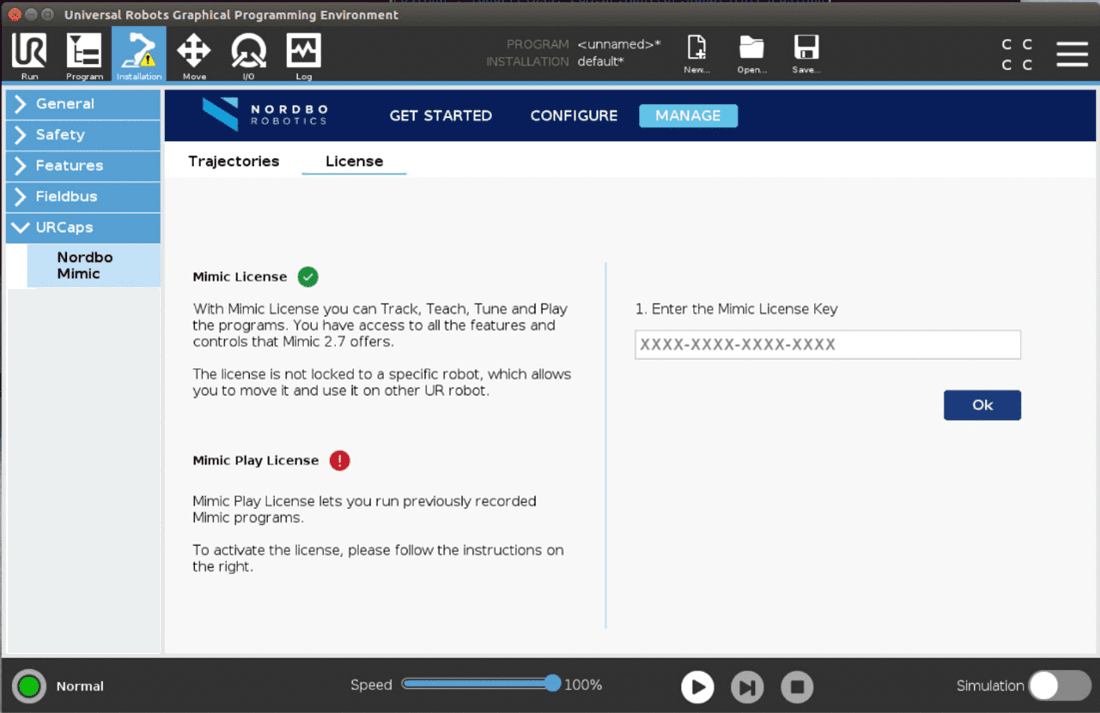
If license activation cannot be executed automatically, user is guided through the process as shown in the screen bellow:
Enter the License Key
Scan the QR code to access the activation ID
Enter the activation ID

How to Use Mimic
Robot Program Nodes – An Overview of Mimic UR Nodes
The following Section describes the process of creating a program using Mimic.
The four Mimic UR nodes:
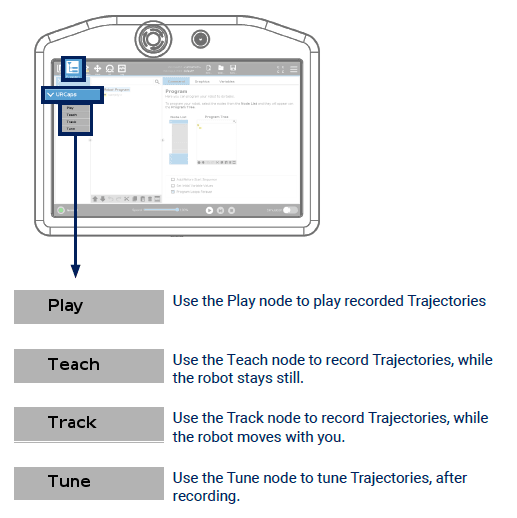
The following sections gives an overview of the different nodes and what they can do.
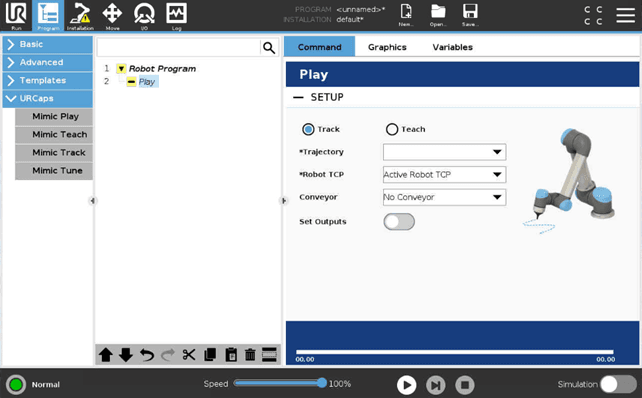
Play
The Play node executes Trajectories recorded using the Teach and Track nodes.
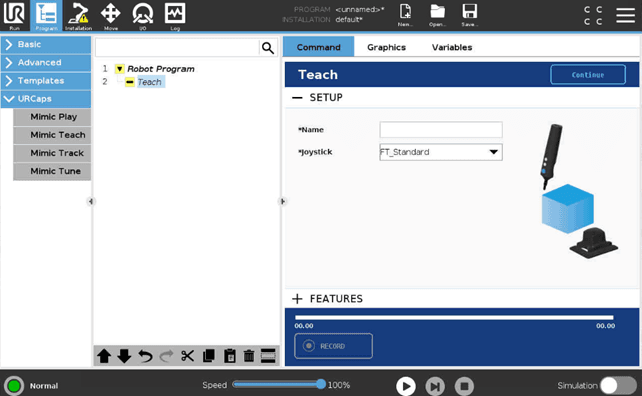
Teach
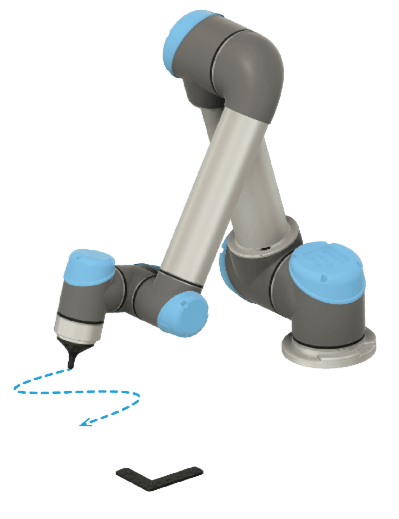
The Teach node is used to record Trajectories relative to the Reference Plate. The position of the Joystick’s TCP is recorded, making it easy to record a Trajectory following a complex path.
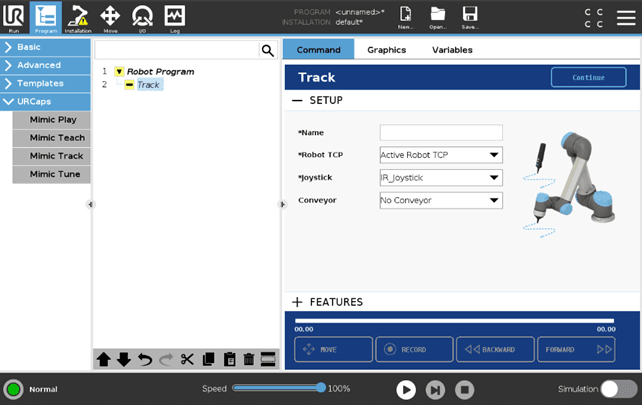
Track
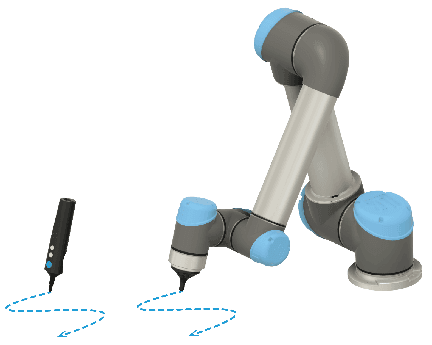
The Track node is used for teleoperating the robot which can be recorded.
When using this node, the robot mimics the movements of the Joystick in real-time, making it easy to see the exact movements being recorded.
Tune
Trajectories recorded using the Teach and Track nodes can be adjusted using the Tune node.
General Information About the Nodes
All Mimic nodes have the same structure. As an an example of a node, see the Track node below.
Except from Play, all Mimic UR nodes have two views:
Setup
Features
Setup enables the user to setup the desired settings for the Trajectory. This must be setup before any recordings can be made and features applied. The symbol "*" in indicates fields that must be filled.
Features enables the user to add use additional features to create the desired Trajectory.
All nodes have a "Continue" button in the top right corner. This button enables the user to continue in the program tree.

All nodes have a Control Panel in the button. Here the timeline of the recorded Trajectory is displayed along with control buttons. These buttons varies between the four nodes.

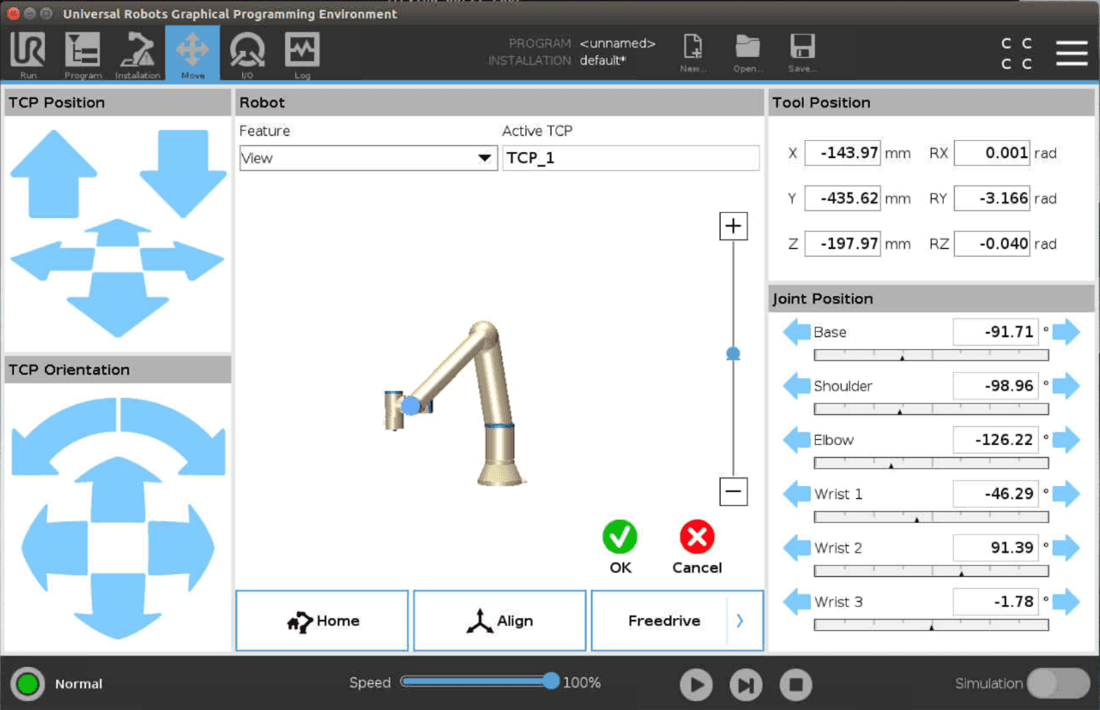
Move - allows the user to move the robot with the used Tracker and Joystick
The “Move” button can be released and clicked at any time during programming to stop/continue the tracking of movements while recording. When the “Move” button is released, the recording will pause until the button is pressed again
Record - allows the user to record the movements made
Be aware that starting a new recording without changing the name will delete the previous Trajectory and begin recording a new
Backward - allows the user to wind backwards in a recorded program.
Be aware that backtracking and recording a new movement will overwrite the Trajectory recorded after this point
Forward - allows the user to wind forwards in a recorded program
The UR program must be running to use the Mimic nodes. When a UR program is running it looks like this:

Using the Track Node
Setup
In Track, Setup view enables the user to setup the following:
Name - name the Trajectory with a meaningful name.
Robot TCP - Select the robot TCP to use.
Choosing the “Active Robot TCP” option will use the active TCP, not the default TCP selected in Installation > Basic
Joystick - Select which joystick to use. The joystick that has been set as default in Installation will be pre-selected.
Conveyor - Optional step. Select which conveyor belt to use, if any. Selecting “No Conveyor” means no conveyor tracking will be used.
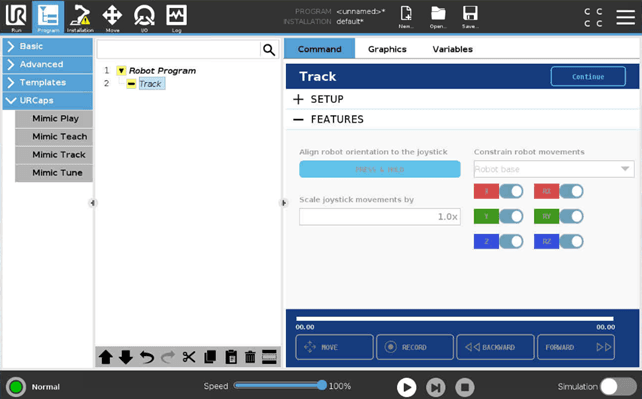
Features
In Track, Features view allow the user to use the optional features:
Align robot orientation to the Joystick.
Constrain robot movements - Lock one or more axis of movements (X, Y, Z and RX, RY, RZ) for the robot by switching them on/off.
The position is locked relative to the feature selected in the combo box. These are the standard UR features, and can be added under Installation > Features. The orientation is locked relate to the TCP.
Scale joystick movements by - The movements of the Joystick can be scaled by specifying a scale. A higher number means the robot moves faster relative to the Joystick.
Example: With a scale set to 2.0x, the robot will move 20 cm when the Joystick moves 10 cm.
Be aware that increasing the scale above 1.0x will make the robot move faster than the user.
Using the Teach Node
Setup
In Teach, Setup view enables the user to setup the following:
Name - name the Trajectory with a meaningful name.
Joystick - Select which joystick to use. The joystick that has been set as default in Installation will be pre-selected.
Features
In Teach, a Teach Frame needs to be specified to use Teach.
The Teach Frame is created using the Reference Plate. When using the Teach node, the Trajectory is recorded relative to the Reference Plate. When executing the Trajectory with a Play or Tune node, it is executed relative to the Reference Plate. The Reference Frame is the position of the Reference Plate relative to the robot base.
To add a Teach Frame (IR Tracker specific):
Position the Reference Plate close to the working piece
Place the Tracker in the Reference Plate
Be aware that the Tracker must be visible for the Lighthouse
Press "Set up"
Press "Calibrate" in the popup

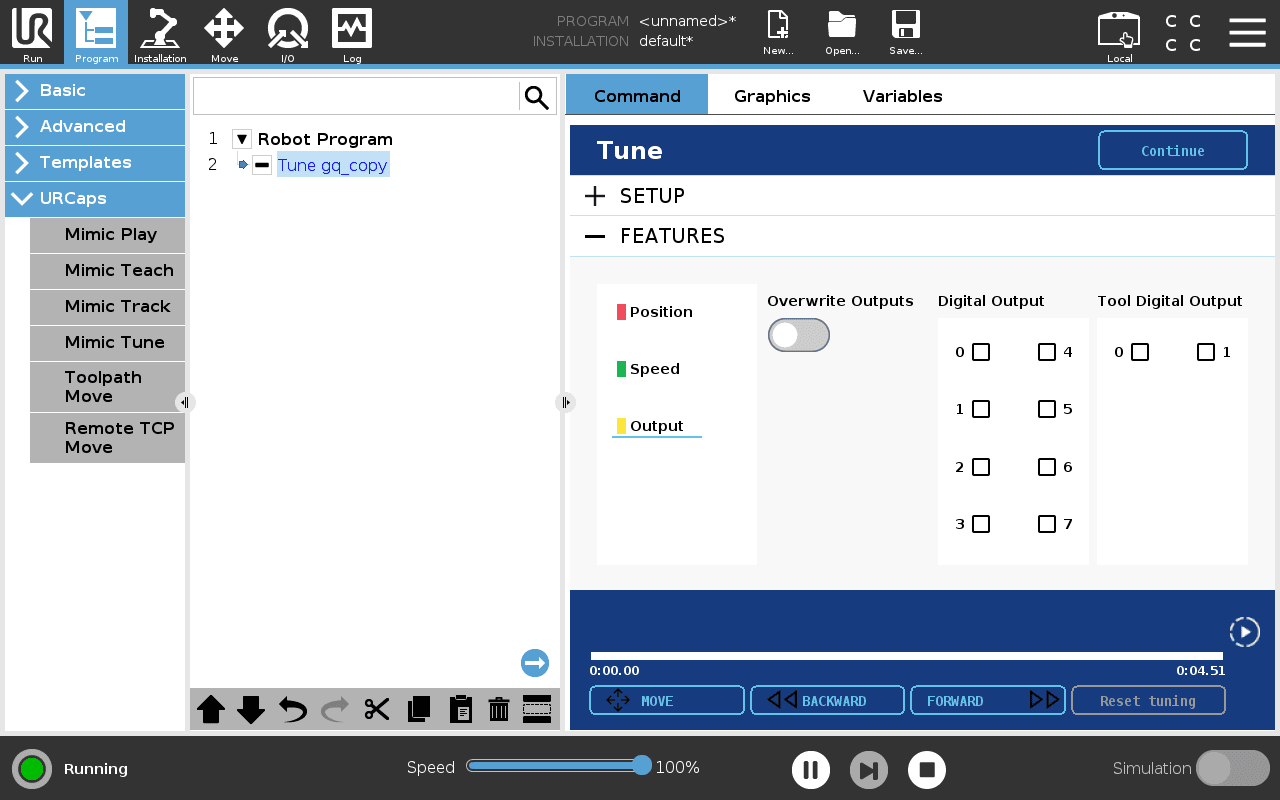
Using the Tune Node
Setup
In Tune, Setup view enables the user to setup the following:
Filter between Trajectories recorded with either Track or Teach
Trajectory - Select the Trajectory to Tune
Robot TCP - Select the robot TCP to use
Choosing the “Active Robot TCP” option will use the active TCP, not the default TCP selected in Installation > Basic
Joystick - Select which joystick to use. The joystick that has been set as default in Installation will be pre-selected
Set Outputs - Activate the recorded outputs while playing
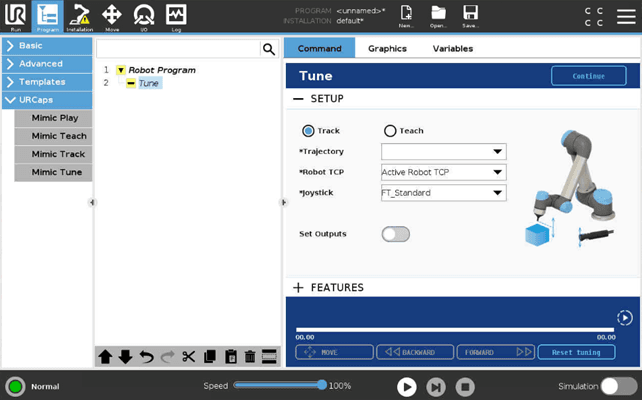
Features
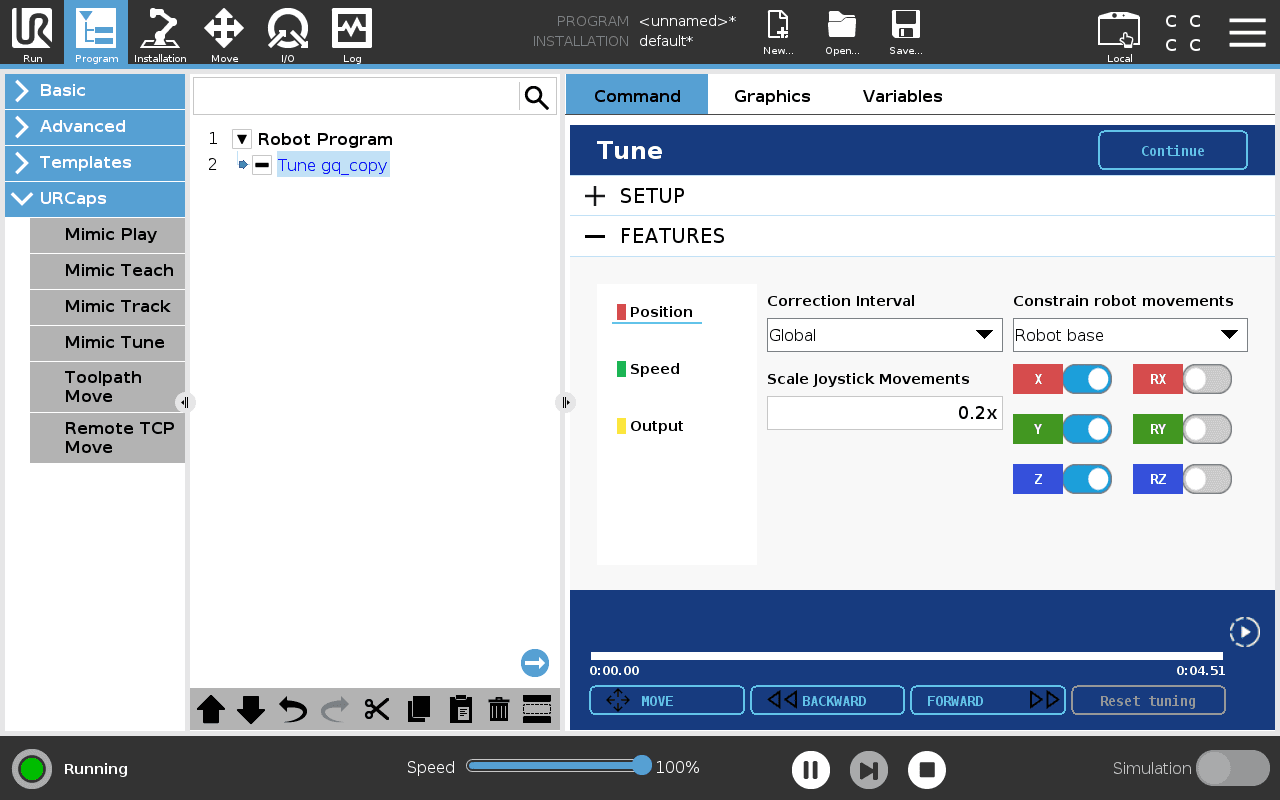
In Tune, Features view allow the user to use the optional features. These are split into three categories:
Position
Speed
Output
Position
Constrain robot movements - Lock one or more axis of movements (X, Y, Z and RX, RY, RZ) for the robot by switching them on/off.
They will be locked relative to the feature selected in the combo box. These are the standard UR features, and can be added under Installation > Features.
Scale joystick movements by - The movements of the Joystick can be scaled by specifying a scale. A higher number means the robot moves faster relative to the Joystick.
Example: With a scale set to 2.0x, the robot will move 20 cm when the Joystick moves 10 cm.
Be aware that increasing the scale above 1.0x will make the robot more difficult to control as its movement will be faster than the user’s.
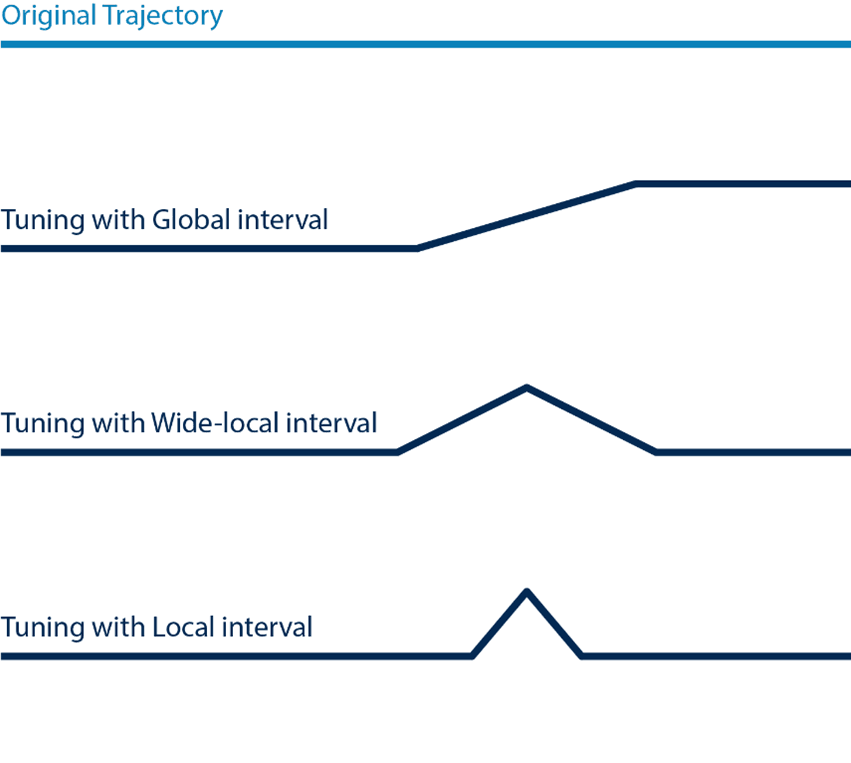
Correction interval - sets the interval in which the Tuning in position is made.
Three options are available (illustrated below):
- Global (this will apply Tuning to the entire recorded Trajectory)
- Wide-local (this will apply Tuning to an interval of the recorded Trajectory)
- Local (this will apply Tuning to a smaller interval of the recorded Trajectory)
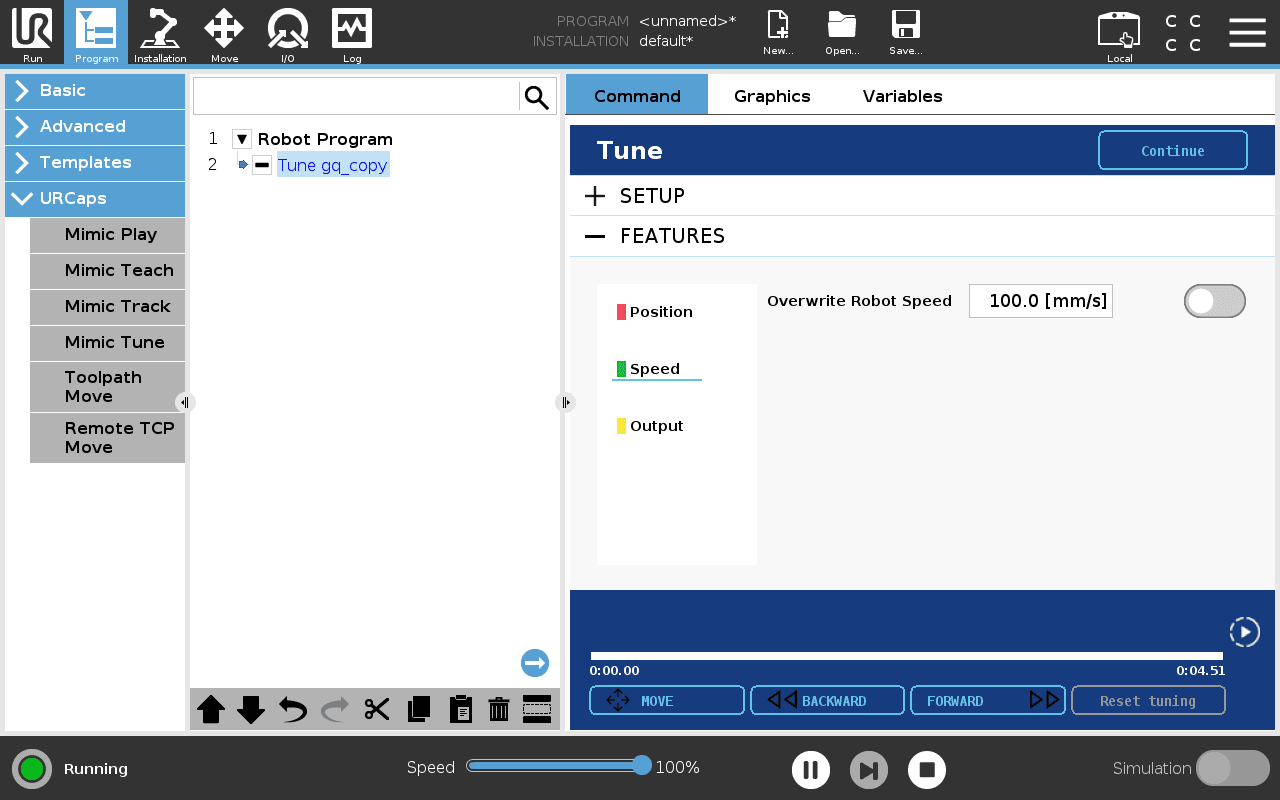
Speed
Overwrite Robot Speed - overwrite the specific speed that the robot moves with.
To overwrite Robot Speed:
1. Press the "Overwrite Robot Speed" toggle and select the desired speed.
2. Move Forward and Backward to set the speed in a desired interval.
3. Press the "Override Robot Speed" toggle again. The specified speed has now been changed in the interval.
Outputs
To overwrite outputs in a desired interval:
1. Press the "Overwrite Outputs" toggle and select which outputs should be active.
2. Move Forward and Backward to set a desired point.
3. Press the "Override Outputs" toggle again. The outputs have now been changed in the interval between the two points.
Using the Play Node
Setup
Filter between Trajectories recorded with either Track or Teach.
Trajectory - Select the Trajectory to Play.
Robot TCP - Select the robot TCP to use.
Choosing the “Active Robot TCP” option will use the active TCP, not the default TCP selected in Installation > Basic
Conveyor - Optional step. Select which conveyor belt to use, if any. Selecting “No Conveyor” means no conveyor tracking will be used.
Reference Frame - Only applies to Trajectories recorded with Teach. Select the Reference Frame to execute the Trajectory in.
Set Outputs - Activate the recorded outputs while playing.
How Outputs are Captured
While recording with the Teach and Track nodes, all outputs are saved, unless turned off in the installation. The outputs are then played back again while executing the Trajectory with the Tune and Play nodes.
Frequently Asked Questions
Which versions of Universal Robots' Polyscope is Mimic UR compatible with?
CB Series: 3.14
eSeries: from 5.9 to 5.13
Why does the tracking sometimes become imprecise or noisy?
If the tracking becomes imprecise or noisy, it could be one of multiple reasons, depending on the Tracker used. Check the Tracker manual for more info.
Why is Mimic unable to connect to the Tracker?
If Mimic is unable to connect to the Tracker, please check or do the following:
Check that all cables are properly connected.
Check that the Robot IP is set correctly.
Check that the Tracker IP is set correctly.
Make sure that only one robot or computer is connected to the Tracker.
Restart the Tracker.
Restart the UR Robot.
Please see the Tracker manual for more info.