Nordbo Conveyor Interface Manual
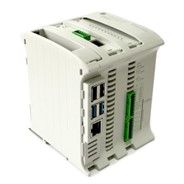
Nordbo Conveyor Interface
Available from version 1.3
The Nordbo Conveyor Interface is a solution for Mimic Core applications where interfacing with a conveyor is required. The Conveyor Interface acts as an IO extension for Mimic, which allows Mimic to receive encoder tick values and trigger signals, independently of the robot brand.
To use the Conveyor Interface, wire it to your setup, and enable Conveyor functionality in Mimic Core.
This page describes the wiring and how to change defaults of the Conveyor Interface, if needed.
Learn more about setting up Conveyor functionality in Mimic Core here.
Conveyor Interface wiring
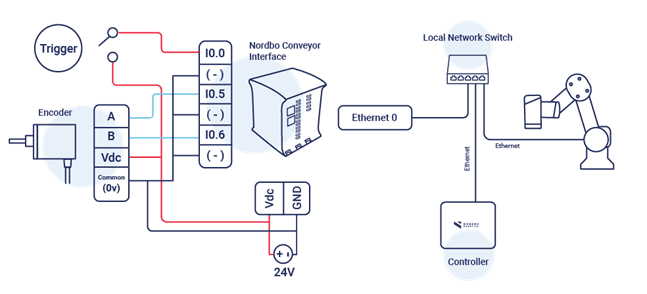
To use the Conveyor Interface with Mimic, compatible components must be chosen and wired correctly. A suitable 24 volt power supply is needed to power the Conveyor Interface. The chosen encoder and trigger must therefore also be compatible with the 24 volt power supply. Additionally, the encoder specifications need to be chosen appropriately based on the speed it is expected to run at, along with the amount of pulses produced per rotation. If the speed and pulses per rotation are too large, the Conveyor Interface will not be able to register all pulses. The Conveyor Interface has been tested to be able to read up to ~360 ticks/s. It is expected to be able to go even faster.
Note: Conveyor Interface is based on PNP
Make sure to use digital input “I0.0” for the trigger signal and digital inputs “I0.5” and “I0.6” for the encoder A and B signals. A wiring diagram can be seen here:
Using the Web Interface
The Conveyor Interface hosts a web interface, which can be accessed by entering the IP address (default is 192.168.1.103) into a web browser. The web interface allows configuration of the network settings of the Conveyor Interface, specifying the IP address of the Mimic Core Controller and monitoring the status of the Conveyor Interface.
Overview of the Web Interface
Configuration
Specify Mimic Core Controller IP address
Network
Enable/Disable DHCP
Static IP address, subnet mask and default gateway if DHCP is disabled
Hostname
Update
Update software on the Conveyor Interface
About
Software version number
Specifying the Mimic Core Controller IP address
The Conveyor Interface communicates with the Mimic Core Controller through the IP address of the Mimic Core Controller. Therefore, in case the IP address of the Mimic Core Controller has been changed from the default address, the new IP address needs to be specified in the web interface of the Conveyor Interface.
Step 1
Navigate to the Configuration tab
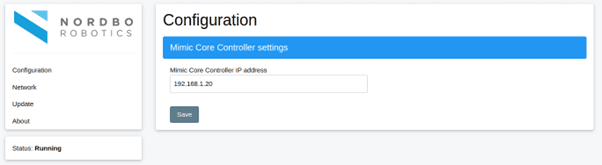
Step 2
Enter the new IP address of the Mimic controller in the “Mimic IP address” field
Step 3
Press the Save button to apply the settings.
Configuring a Static IP address
Note: If the IP address of the Nordbo Conveyor Interface is changed, the IP address of the web interface also changes. Be sure to use the correct address when trying to access the web interface.
Step 1
Navigate to the Network page
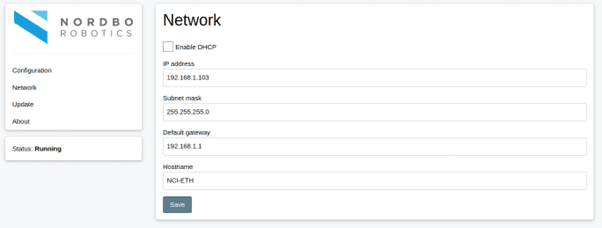
Step 2
Ensure the “Enable DHCP” box is unchecked
Step 3
Enter the desired IP address in the “IP address” field
Step 4
Enter the desired subnet mask in the “Subnet mask” field
Step 5
Enter the desired default gateway in the “Default gateway” field
Step 6
Press the Save button to apply the settings.
Configuring DHCP client
If the Conveyor Interface is configured as a DHCP client it will obtain an IP address from a DHCP server on the network if any such exists.
Step 1
Navigate to the Network page
Step 2
Check the “Enable DHCP” check box
Step 3
Press the Save button to apply the settings.
Updating the Conveyor Interface Firmware
Step 1
Contact your Nordbo Robotics contact for any updates
Step 2
Download the update file and store it on your PC. The file should have the file extension “.deb”
Step 3
Navigate to the Update tab.

Step 4
Click the “Browse…” button on the web page to select the downloaded update file
Step 5
Click the “Update” button
Step 6
Wait for the web page to say “Firmware updated successfully”
The firmware is now updated.