Frames Settings 2.0
(Video recorded on Mimic Core version 1)
Overview
Depending on the case you are working one, you may need to create frames.
Frames are fields with specific placements that the robot uses to know where it is and where to go. Think of them as pieces of paper, that we can define in different places at certain angles. Hence, they consist of:
Position
Rotation
(Frames are measured from the base of the robot.)
These can be defined with the Calibration Wizard or manually (by measuring from the robot base to the desired frame).
X, Y and Z modifies the position
RX, RY and RZ modifies the orientation
Usage of Frames
Frames can be used as:
Generic frames and can be used for locking movements in Track.
Planes can be used for restricting robot movements when aiming for higher precision. For example, you can lock robot movements to a plane.
Teach Frames are used for Teach and specifies where the recorded Trajectory will be executed in relation to where it was recorded.
How to add
To add a new Frame, click the “Add”
Use the Calibration Wizard to calibrate the Frames or measure manually.
See specific calibration wizard guidelines in the video.
How to Calibrate: 2 Options
2 options are available for calibration of frames:
Option 1: Standard calibration
Option 2: Custom calibration
Standard calibration can be achieved using the Reference Plate in the kit - or by defining 1) Origin, 2) positive X and 3) positive Y axis, using the robot.
Custom calibration can be achieved by using custom calibration pointers, the robot and the Tracker.
When defining the positive X and Y axis with the robot, it is recommended to use the robot to jog in the exact direction (given that the robot is mounted to allow for such).
Option 1: Standard Calibration
Create frames by providing 1) Origin, 2) positive X and 3) positive Y axis point data, using the robot. The Reference Plate can be used as a guide.
A pointy element on the robot is recommended to ease the work. The Robot Pointer in the package can be used.

You can copy and offset workspaces by duplicating Frames and recalibrating them to a new position.
Option 2: Custom Calibration
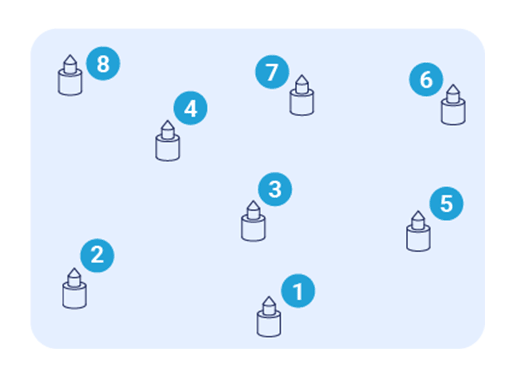
Some workspaces require a custom calibration. In these cases, custom calibration can be made.
Several points can be defined. Minimum 4 points are needed. More points will result in a more precise calibration.
Needed for custom calibration:
Custom pointers to place in workspace
Pointers on the robot (e.g. the Robot Pointer in the kit)
Robot
Tracker and Tracker Mount/Joystick
How to:
Place the pointers in the workspace. Make sure they cover as much of the workspace as possible
For each point, bring the robot pointer and the Tracker Mount/Joystick to the pointer
(this can be done in sets ; or first all robot points, then Joystick points ; or first all Joystick points, then robot points)
Repeat for min. 4 points. Adding more will result in higher precision.
Calibrating a Reference Frame for Improved Accuracy
The steps provided in this section guides you through calibrating a Frame for improved Accuracy.
The steps guide you through testing the existing Frame, making a series of recordings to review the accuracy, then adjusting them.
These recordings are created in Teach.
If you are using the standard components provided in the Tracker kit:
- Make sure to select the pointer as default
- Make sure to select the IR Standard Joystick with Pointer as default
If using custom hardware (Joystick and Robot Tool)
- Make sure that both are set as default
- Make sure to use their TCPs as the guiding point for the exercises below.
Defaults can be set in Settings, and are displayed with the icon:

Steps to perform
First Recording: Linear Movement in Positive Y
Make sure that you can check the relation between the recorded path and the path executed by the robot (e.g. by marking it with a marker, or placing a linear item)
Create a recording a linear movement in the positive Y direction. It is recommended to create a path with a long distance, as deviations from the intended line will be more significant.
Ensure that the Joystick TCP is oriented perpendicular to the surface tested against.
Review the Recording
If the recorded line is not followed by the robot, return to the reference frame calibration.
Correct the orientation by applying the offset discovered.
Repeat until satisfying result has been achieved.
Second Recording: Linear Movement in Positive X
Repeat the steps from the previous section.